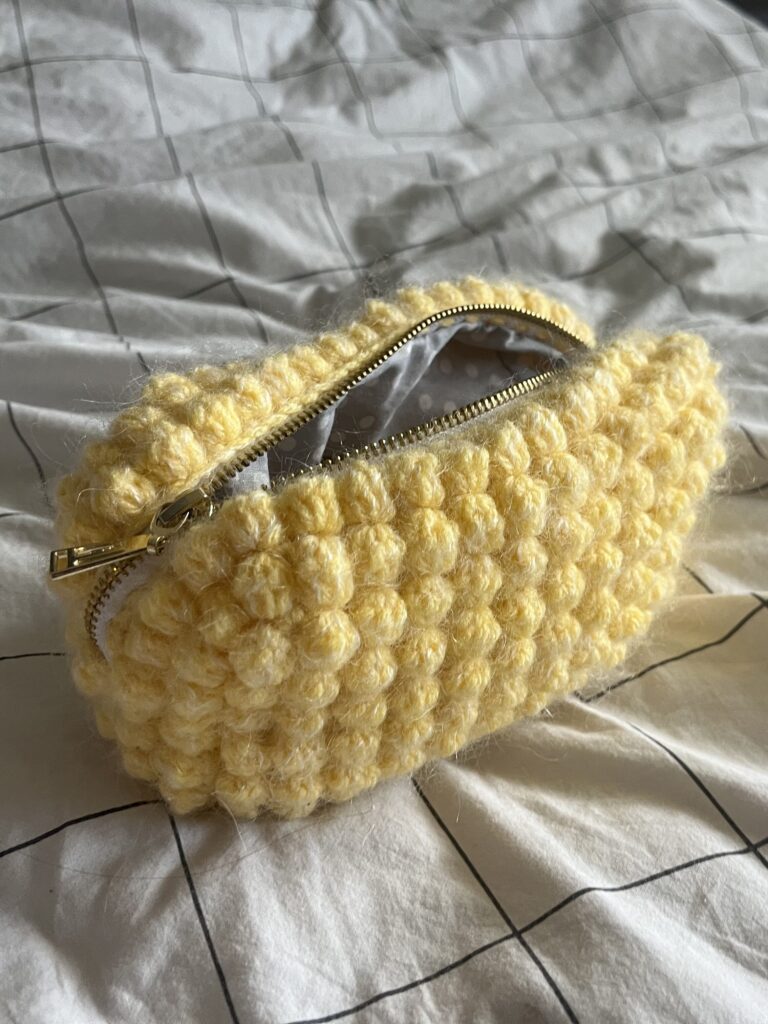
Make your own cozy crochet bubble pouch with this step-by-step pattern ✨ Featuring a beautiful textured design and zipper closure, this project is perfect for beginners looking to create something both practical and aesthetic.
© 2026 dariarsii. All rights reserved 💕
This pattern is for personal use only
Crochet Bubble Pouch Video Tutorial
📊 Pattern Info
Skill level: Beginner–Intermediate
Technique: Bubble stitch
Time: 5–8 hours (depending on experience)
🧵 Materials
– Fine or light yarn
– Crochet hook
– Zipper 30 cm or more
– Fabric if you wish to put it into
– Regular needle and thread
– Scissors
– Tapestry (cross-stitch) needle
✍️ Abbreviations
ch – chain
sc – single crochet
dc – double crochet
YO – yarn over
WS – wrong side
🧶 Free Bubble Pouch Pattern
Stage 1! Two 21-Bubble Lines
- Ch 43
Row 1:
-Sc in 2nd ch from hook, sc across (42 sts)
Row 2 (Bubble Row):
-Ch 2
-Work 5 incomplete dc in same stitch
-YO, pull through all 6 loops
-Ch 1
-Sc in next stitch
👉 Repeat across (21 bubbles)
Row 3 (SC Row):
-Ch 1
-Sc in top of bubble and in next sc
-Repeat across
👉 Repeat Rows 2–3 once more (2 bubble rows total)
👉 Ch 1, fasten off
Stage 2: Seven 13-Bubble Lines (Decreasing)
- Turn work (WS facing)
- Insert hook into sc above 5th bubble
- Ch 2
👉 Work 13 bubbles across
Next Row:
Ch 1, sc across
👉 Repeat (bubble + sc rows) for 6 lines total
👉 Work 1 final bubble row only
👉 Fasten off
Stage 3: Five 21-Bubble Lines (Increasing)
- Sc 8
- Continue sc across previous row
- Ch 8
👉 Turn
Bubble Row:
Ch 2, work 21 bubbles
Next Row:
Sc across
👉 Repeat 4 more times (total 5 bubble rows)
👉 Ch 1, fasten off
Stage 4: Seven 13-Bubble Lines
👉 Repeat Stage 2 exactly
👉 On last line: bubble row only
👉 Fasten off
Stage 5: Two 21-Bubble Lines
👉 Repeat Stage 3, but make only 2 rows
👉 After final sc row:
Ch 1, fasten off
Finishing
Weave in all yarn ends using a yarn needle.
Zipper & Assembly
- Attach zipper along the top edge using a yarn needle
- Sew evenly across, working through each stitch
- Repeat for the other side of the zipper
👉 Make sure zipper stays on the outside
- Fold pouch and sew sides together
- Align bubble rows neatly
💡 Optional:
Shorten zipper by wrapping thread around teeth and trimming excess
Final Result
Your bubble stitch pouch is now complete! ✨
A stylish and functional handmade piece perfect for everyday use.
💡 Tips
- Keep tension even for clean bubbles
- Use thicker yarn for a chunkier look
- Great project for gifts 🎁
💌 Stay Connected
- Follow me on YouTube
- Save this pattern on Pinterest
- More patterns coming soon 💖
Categories


Leave a Reply