This crochet shell stitch sunglasses case is one of my favorite summer makes — it’s quick, beginner-friendly, and actually functional!🕶️ Worked in the round with no seaming, it features a beautiful repeating shell stitch pattern and a simple drawstring closure to keep your glasses safe. I also made a full step-by-step video tutorial on my YouTube channel if you prefer to follow along visually — just grab your favorite cotton yarn and let’s make it together!
© 2026 dariarsii. All rights reserved 💕
This pattern is for personal use only
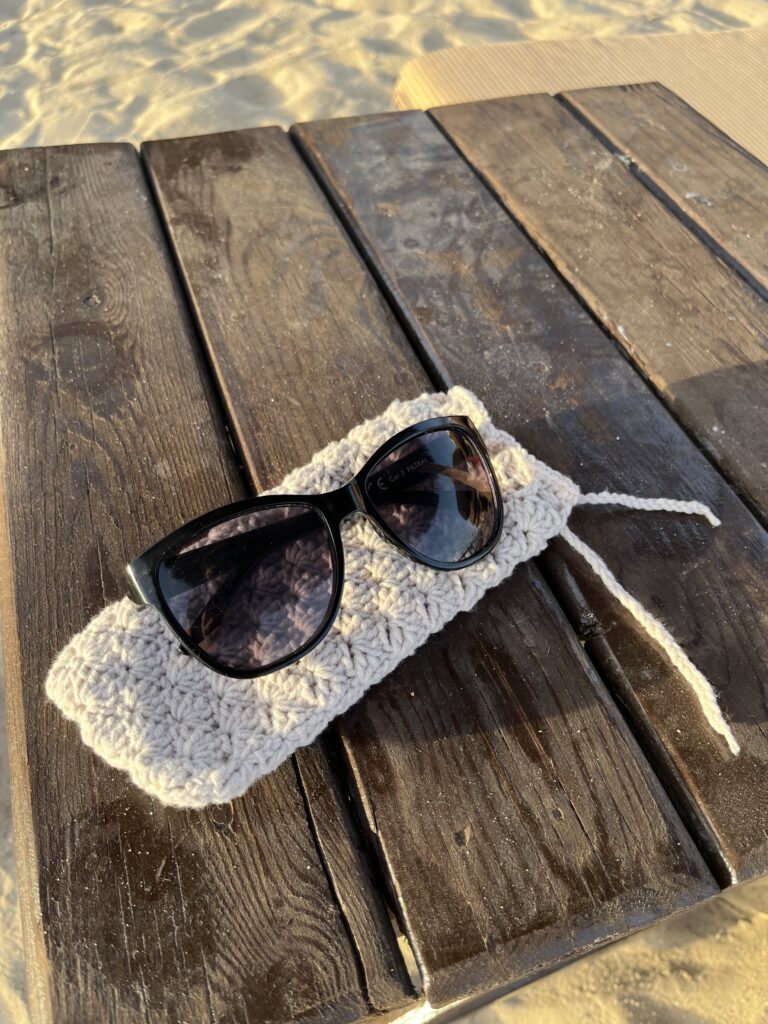
Glasses Case Video Tutorial
📊 Pattern Info
Skill level: Beginner
Technique: Shell stitch
Time: 2-3 hours
🧵 Materials
– DK or worsted weight cotton yarn
– 3–3.5 mm crochet hook
– Scissors
– Yarn needle
– Optional: 2 large beads for the drawstring ends
– Stitch marker (optional)
✍️ Abbreviations
ch – chain
SC – single crochet
DC – double crochet
sl st – slip stitch
st(s) – stitch(es)
rep – repeat
🧶 Free Glasses Case Pattern
Foundation: Chain 19
– Make your foundation chain of 19 stitches.
1 Row — Shell stitch along foundation chain
– Ch 1.
– Work 1 SC into the next ch.
–*Skip 2 ch, work 5 DC into the 3rd ch. Skip 2 ch, work 1 SC into the 3rd ch.*
– Rep * 2 more times
– Skip 2 ch, work 1 SC into the last ch.
– Without turning your work, rotate to work into the back loops of the foundation chain. In the back of the same stitch where you just worked your last SC, work 1 more SC — use this stitch to hide your yarn tail.
– Rep * to the end of the round.
– Sl st into the first SC made at the start of Round 1.
Working into the back of the foundation chain creates the second side of the case, giving it its tubular, case-like shape.
2 Row – Shell pattern with split turning edge
– Ch 3 (counts as first DC). Work 2 DC into the same st — 3 DC total.
– Skip 2 sts, work 1 SC into the top of the 3rd DC of the shell below.
– *Work 5 DC into the top of the next SC. Work 1 SC into the top of the 3rd DC of the next shell.*
– Rep * one more time.
– At the turning edge, you will see two SC sts sitting side by side from the previous round. Work 3 DC into the first SC, then 3 DC into the second SC — this creates a 6 DC turning shell. Work 1 SC into the top of the 5th DC of the next shell.
– Skip 2 sts, work 1 SC into the top of the 3rd DC of the shell below.
– Rep * 2 more times
– At the end of the round, work 3 DC into the last SC.
– Sl st into the top of the 3rd ch from the ch-3 at the start.
3 Row – Shell pattern with narrow turning edge
– Ch 1. Work 5 DC into the first SC from the previous round.
– *Work 1 SC into the top of the 3rd DC of the next shell. Work 5 DC into the top of the next SC.*
– Rep * one more time
– At the turning edge, you will see a 6 DC shell. Skip 2 DC, work 1 SC into the top of the 3rd DC. Work 1 SC into the top of the 4th DC.
– Skip 2 DC, work 5 DC into the SC from the previous round. Continue the established pattern across the second side to end of round.
– Rep * two more times
– At the second turning edge, skip 2 DC and work 1 SC into the top of the 3rd DC.
– Sl st into the ch-1 made at the start of this round.
Pattern repeat
-Alternate Round 2 and Round 3 until the case is long enough to fit your sunglasses. Lay your glasses on top of the work to check the length — the case should be slightly longer than the frames. A total of 9-11 repeats of Rounds 2 and 3 is recommended, but adjust freely to suit your glasses.
Drawstring round
Ch 4 (counts as 1 DC + ch 1).
– *Skip 1 st, work 1 DC into the next st, ch 1.*
– Rep * all the way around.
– Sl st into the 3rd ch of the ch-4 at the start of the round.
Final round – Single crochet edge
– Ch 1. Work 1 SC into every st around. Sl st to join.
– Ch 1, pull yarn through, and cut.
– Weave in all ends with your tapestry needle.
Finishing — drawstring
Using the same or a contrasting yarn, make a chain of 60–70 stitches, or longer if preferred. Fasten off.
Starting at one end of the drawstring round, weave the chain in and out through each DC space all the way around — in through the front, out through the back, repeating to the end. Pull both ends even.
If desired, thread a large bead onto each end and knot to secure.
💌 Stay Connected
- Follow me on YouTube
- Save this pattern on Pinterest
- More patterns coming soon 💖
Categories
Leave a Reply